
Here is the complaint I hear from small-kitchen cooks every single time: "I tried baking in my toaster oven and it came out burnt on one side, raw on the other." I lived that frustration for two years in my Brooklyn galley before I figured out that the oven was not the problem. My technique was. A compact toaster oven operates differently than a 30-inch wall oven, and once you understand the three or four ways it behaves differently, you stop fighting it and start getting results that are genuinely better than what a lot of people get from a full-size appliance.
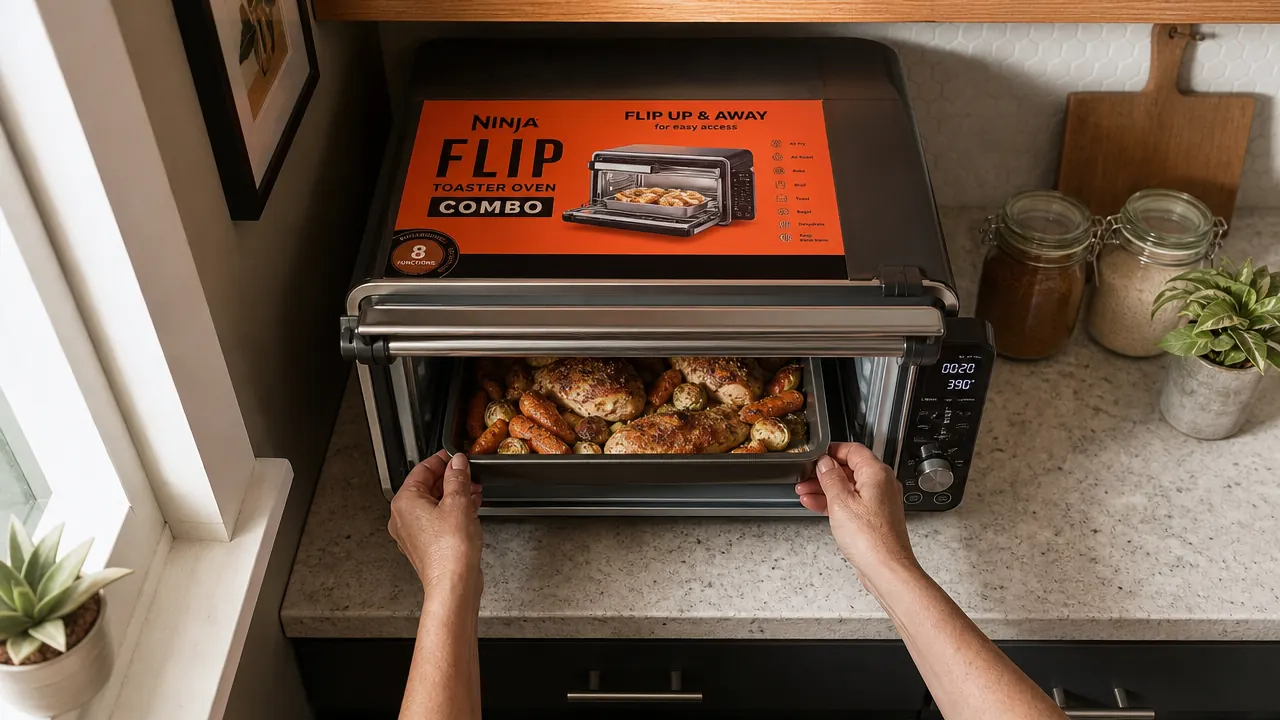
The Ninja Flip Toaster Oven (model SP101) is what I cook on now. It is an 8-in-1 air fryer and toaster oven combo with a door that folds up and out of the way instead of swinging forward into your clearance space. That design detail alone made it worth the counter inches in my apartment. But the machine is only as good as your method. This guide covers both: what the Ninja Flip does well and exactly how to use any compact toaster oven to bake and roast food that comes out right.
Your apartment oven is costing you counter space and uneven dinners. The Ninja Flip fixes the clearance problem and the cook problem at the same time.
The Ninja Flip Toaster Oven folds its door up instead of out, freeing the 12 to 14 inches of clearance every other toaster oven steals from the front of your counter. Rated 4.6 stars across nearly 30,000 reviews. Available on Amazon with current pricing.
Amazon Check Today's Price on Amazon →Step 1: Run a Calibration Bake Before You Cook Real Food
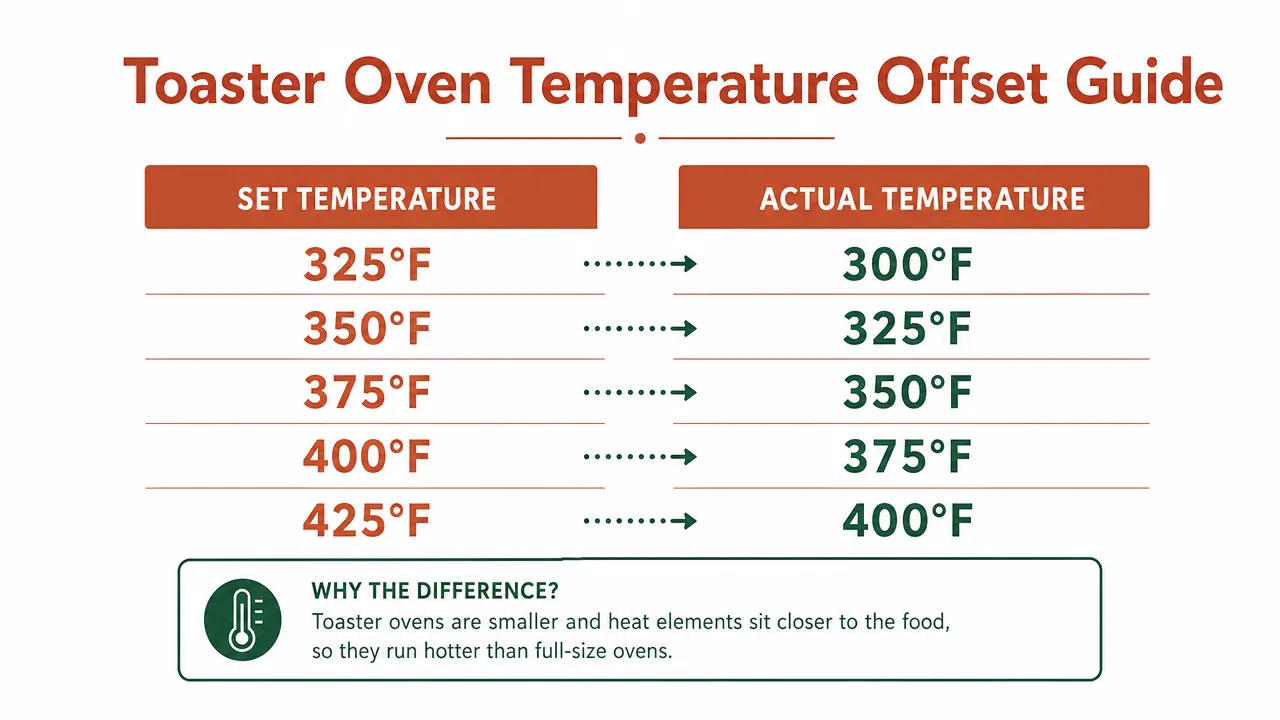
Compact toaster ovens, including the Ninja Flip, almost always run hot. The heating elements are 3 to 5 inches from your food instead of 8 to 12. The cavity heats faster and holds less thermal mass. That means when you dial in 350 degrees, you are often getting 370 or 380 degrees inside. Before you ruin your first batch of cookies or your first roast chicken breast, spend 20 minutes getting a read on your oven.
Buy a simple oven thermometer for under ten dollars and place it in the center of the rack at mid position. Set the oven to 350 degrees and let it preheat fully, which on the Ninja Flip takes about 5 minutes. Read the thermometer. Write that number down. Do it again at 375 and at 400. Most compact ovens run 15 to 25 degrees hot. Once you know your oven's offset, you adjust every recipe before you start. If the recipe says 375, and your oven runs 20 degrees hot, you set it to 355. That single habit eliminates probably 80 percent of the "toaster oven ruined my food" complaints.
On the Ninja Flip specifically, I found the convection setting runs closer to the dialed temperature because the fan distributes heat more evenly and prevents the hotspot buildup you get in straight-radiant mode. For baking, I use convection and reduce the recipe temperature by 25 degrees rather than relying on straight bake mode.
Step 2: Use Rack Position as Your Primary Heat Control
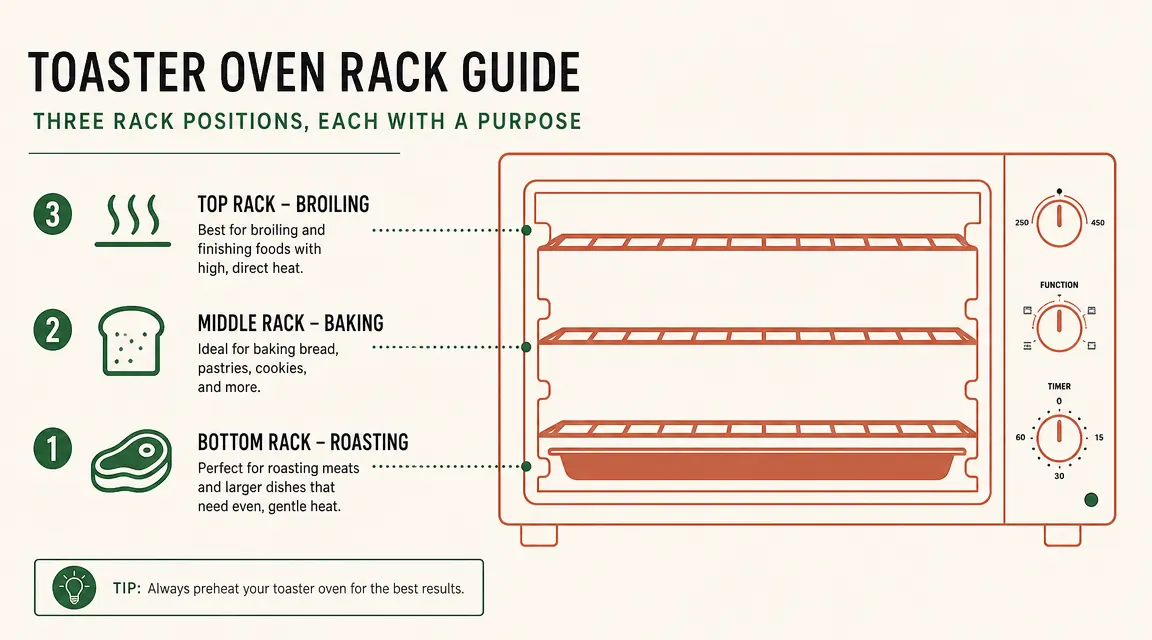
In a full-size oven, rack position matters but you have a foot of distance to work with between slots. In a toaster oven, each rack slot change moves you 1.5 to 2.5 inches closer to or farther from the heating elements. That gap is everything.
The rule is straightforward. Bottom rack for roasting meats, where you want direct heat underneath for browning the bottom and do not want the top element to blast the surface dry before the interior cooks through. Middle rack for baking, where you want even ambient heat from both elements. Top rack position for broiling and finishing only, never for a full cook. The Ninja Flip has two rack slots and a crumb tray. I use the lower slot for almost everything I roast and the upper slot only for final browning when I want to add color in the last three to four minutes.
One practical note: the Ninja Flip's included sheet pan sits very close to the lower heating element on the bottom slot. For anything lean like chicken breasts or fish fillets, put a small piece of foil under the pan or elevate it on the wire rack to create a buffer. This prevents the bottom from charring before the top side sets.
Step 3: Preheat Fully and Use the Right Pan Size
I see people skip preheat on toaster ovens because it feels like a small box that should be instant-ready. It is not. The element needs to saturate the interior with heat before food goes in. Put a cold pan of chicken into an element that is still climbing and you get uneven cooking and longer total time. The Ninja Flip tells you when it has reached temperature with an audible beep. Wait for it.
Pan size is the other thing that trips people up. A toaster oven's interior is 10 to 12 inches wide and 10 to 11 inches deep on most compact units. The included Ninja Flip pan is sized exactly for its cavity, which is fine for most uses. But if you crowd the pan, you trap steam and your food braises instead of roasting. Leave at least a half inch of clearance on all sides of your food. For sheet pan vegetables, spread them in a single layer with space between pieces. If you have too much food to fit without crowding, cook in two batches. A second 10-minute batch beats a first batch that came out steamed and soft.
The toaster oven does not fail. The technique fails. Get the offset, the rack, and the preheat right, and a compact oven outperforms a full-size one for anything under four pounds.
Step 4: Match the Cook Mode to the Food
This is where the Ninja Flip's 8-in-1 functionality actually earns its listing. Most toaster ovens have bake and toast and maybe broil. The Ninja Flip gives you air fry, roast, bake, broil, toast, bagel, reheat, and dehydrate as distinct presets. They are not marketing labels, they are actually different combinations of element use and fan speed.
For chicken thighs, drumsticks, or bone-in protein, use the Roast setting. It cycles both elements with moderate fan speed and delivers browned exteriors without drying out the interior the way Air Fry mode would on a slow-cooking item. For cookies, quick breads, or anything where you want a gentle even heat without direct-surface crisping, use Bake with convection. For anything you want genuinely crispy on the outside fast, like frozen vegetables, thin-cut pork chops, or reheated pizza, use Air Fry mode, which runs the fan at high speed and focuses heat from the top element.
The biggest misuse I see is putting thick proteins on Air Fry when Roast is the right call. Air Fry hits the outside fast, which looks great at 10 minutes but leaves the inside undercooked. If it has a bone or is more than an inch thick, use Roast mode and give it the time it needs.
Step 5: Rest and Tent, Then Slice
Small ovens run hot air at close range, which means proteins can look done when they are not, or look underdone because the exterior crust forms before the interior fully climbs in temperature. A probe thermometer is worth keeping next to this oven. Chicken is done at 165 degrees internal. Pork at 145. A medium-rare steak at 130 to 135. Pull by temperature, not by color or time estimate.
After you pull the protein, tent it loosely with foil and rest it for five minutes on a cutting board. The toaster oven drives so much heat into the surface of the food that the internal temperature continues to rise two to four degrees after removal. Account for that carryover. Pull a chicken breast at 160 degrees internal, rest for five minutes, and it will read 165 by the time you slice. This is true in any oven but it matters more with a compact unit because the surface-to-interior heat gradient is steeper.
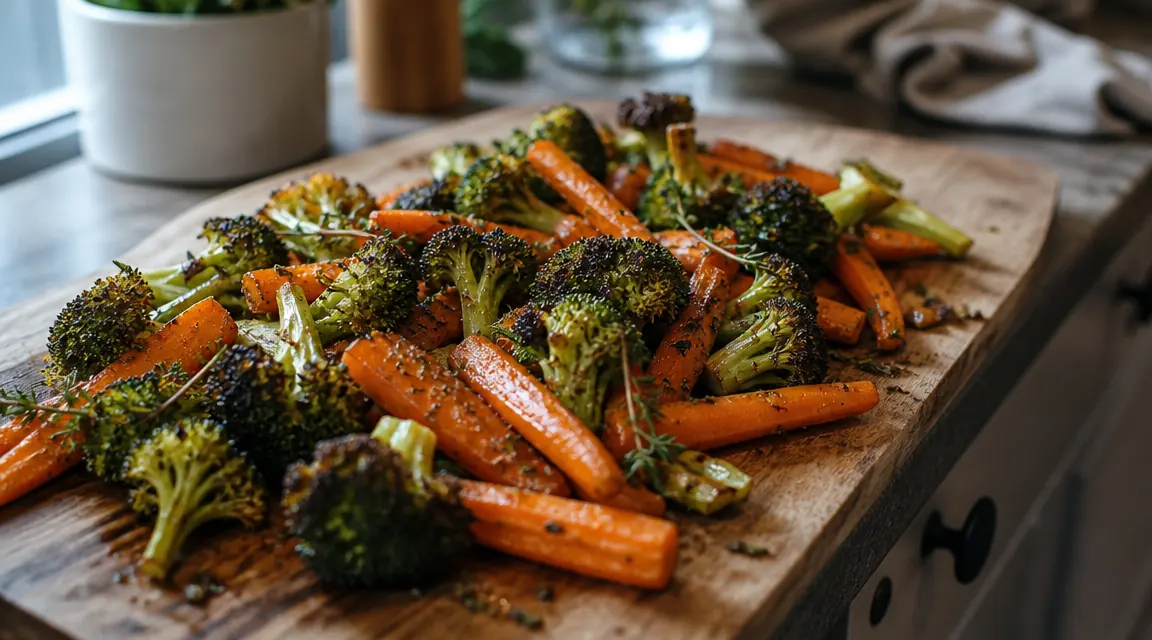
For vegetables, no resting needed. Pull them when the edges have color, the centers are tender when pierced with a fork, and there is no visible steam rising from the pan. If you see steam, there is still moisture escaping and they are not roasted yet, they are finishing a braise. Another three to four minutes usually closes it.
What Else Helps
Two accessories that cost almost nothing and make a significant difference: a small wire rack that fits inside the pan (about eight dollars on Amazon) and a box of parchment paper cut to fit the pan. The wire rack lifts food off the pan surface so hot air can circulate underneath. This matters especially for bone-in chicken, whole fish, and thick pork chops where you want the underside to render and color rather than steam in its own juices. Parchment keeps cleanup fast and protects the pan's nonstick coating from acidic marinades.
For the Ninja Flip specifically, the space-saving door design means you can leave it on the counter with less clearance worry, which matters in a narrow galley. But you still need about 4 inches of clearance above the unit when the door is folded up in open position. Account for that when deciding where it lives on your counter. In my kitchen, it sits at the end of the counter nearest the window where the cabinet above it ends, giving it exactly the vertical clearance it needs without any modification.
If you want the full breakdown of how the Ninja Flip handles long-term daily cooking, including the things that are genuinely inconvenient about it, the long-term review covers all of that. And if you are trying to decide between the Ninja Flip and a lower-priced option, the honest review compares both angles without the marketing spin.
If your current setup means pulling the whole oven out or blocking access to your other appliances every time you want to bake, the flip door is worth the upgrade cost.
The Ninja Flip Toaster Oven (8-in-1, includes air fry and roast modes) is the machine I use every day in a 400-square-foot apartment kitchen with no wall oven. The fold-up door is not a gimmick, it solves a real clearance problem. Check current pricing on Amazon.
Amazon Check Today's Price on Amazon →